
Rochester prides itself on being a university that is never content with “good enough.” But “ever better” doesn’t just happen. It takes people who crave progress and are passionate about innovation, people who are always learning, exploring, creating, and tinkering. This is the essence of a makerspace.
A makerspace is any room, lab, or workspace that provides tools and tech that allow individuals to have hands-on learning and skill-building experience. They’re veritable breeding grounds for Meliora.
Jason Harvey, the physics, optics, and astronomy librarian, knew Meliora and makerspaces go hand-in-hand before he was even a member of the River Campus Libraries staff. Harvey was interviewing for his current position when he proposed the idea of a makerspace. That idea is now a fully functional program.
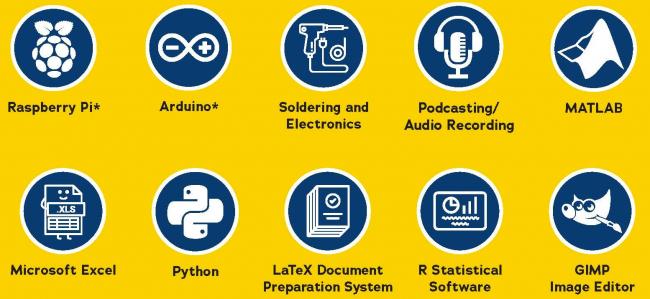
Since 2017, TinkerSpace has served as Rochester’s mobile makerspace program. Its core offerings are introductions to Arduino, Excel, GIMP, LaTeX, Matlab, R, Raspberry Pi, and soldering. More recently, the program has added intro courses to Python and Unity Game Engine. These programs are in various locations across the River Campus, including the Art & Music Library, Carlson Science & Engineering Library, iZone, the Physics-Optics-Astronomy Library, and the Rossell Hope Robbins Library.
To meet the increasingly diverse needs of student and faculty researchers, TinkerSpace is also developing a multi-session audio recording and podcasting program. The plan is to hold the program in Ronald Rettner Hall for Media Arts and Innovation. It will begin with an orientation on audio recording and podcasting, and then it will split into separate tracks. After a track is completed, the participant will be authorized to use the facility and equipment to produce their own media.
“The value of TinkerSpace is in the basic, hands-on overviews it provides,” says Harvey. “These are technologies that we know students want to learn, but Rochester faculty members often don’t have the bandwidth to teach.”
TinkerSpace is open to all students, faculty, and staff from all areas and disciplines. To put it another way, this isn’t just for engineering students. Case in point: no previous experience is required. Skeptical? To put newbies of all types at ease, Tower Talk Editor Matt Cook, who’s never held a soldering iron, attended Soldering 101.
Pre-program
I’m not a particularly handy person. So, walking into the Rettner Hall Fabrication Studio, I couldn’t help thinking about the scene in Home Alone where Kevin braces himself before his face off against the Sticky Bandits.
The fabrication studio feels like a TinkerSpace setting. There are work tables spread across the room, signs telling you how not to maim yourself, and a lot of cool-looking equipment that I desperately want to know how to operate.
It looks like this particular session is going to be smaller in size. Hopefully, that means I’ll have dedicated guidance/supervision.
I’ll be working next to Ali, a junior who is majoring in American Sign Language.
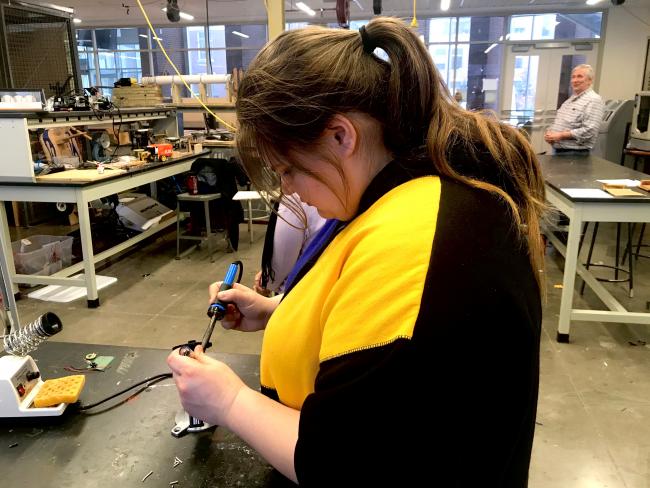
Welcome to Soldering 101
The program is being run by physics, optics, and astronomy librarian Jason Harvey. He’s been assisted by science and engineering outreach librarians Allegra Tennis and Sarah Siddiqui.
We’re told goggles are optional due to a “low splash risk.” But what I hear is, “There will be splashes.” Everyone seems confident iron will not end up in their eyes, though. I’ll roll the dice. No goggles!
I definitely missed parts of the instructional preamble while I was envisioning a future where I’m explaining to people that I’m blind due to a soldering accident. However, I do catch that for your soldering iron to be most effective, it should have a “shiny tip.”
Shiny tip. Got it. Let’s solder!
Solder This Pig Tail
Our first challenge is to solder two wires together. (If you’re into wires, they were 20-gauge, stranded.)
To prepare for this task, we first had to cut away some of the wire’s insulation. Then, we had to twist the exposed pieces so that they were intertwined. Apparently, this is called a “pig tail.”
To do the actual soldering, we had, of course, the soldering iron and our soldering wire. The trick was to make sure the iron, the wire, and the pig tail were all in contact. Once the wire starts to melt, you drag it along the pig tail, coating it.
Allegra was helping Ali and me. She explained that when you’re doing it right, it should be like running a pair of scissors through wrapping in one, clean motion. I explained that I am terrible at that.
Here’s how my pig tail soldering went:
1st attempt: Oof. Really clunky application. It helps to have steady hands, and my right hand, which was holding the wire, was not cooperating. (I’m left-handed.)
2nd attempt: Much better. Surprise! It helps to know what you’re doing.
3rd attempt: I’m a master craftsman.
I’m sure my work was OK at best, but I felt like I had it down. I soldered a couple more pig tails for fun.
Make This LED Light-Up with a Button
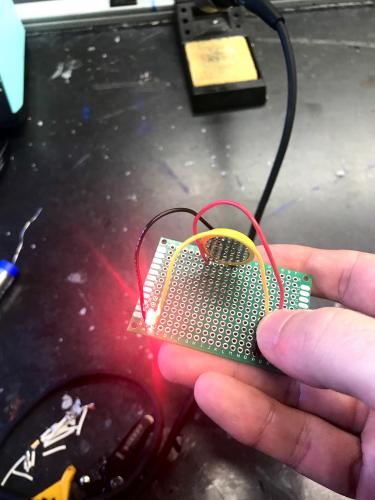
Our second task was to solder several pieces together that, when assembled, allowed you to light an LED by pressing a button.
We were given the following pieces:
- Protoboard
- Button
- LED (I chose red)
- 3V lithium coin battery (20mm)
- 3 solid-core wires
The challenge here wasn’t the soldering because as I had mastered the skill. What I struggled with was figuring out where all the wires went. I even had a model to work off of, and it just wasn’t clicking for me. So, that was a humbling process.
When everything was connected and in place, it needed to be soldered so it would stay put. It presented a new challenge, as I needed to be a lot more precise. But I adapted quickly, and it turned out pretty good.
My solder neighbor
After the solder had cooled and the irons had been holstered, I took a moment to check-in with Ali and see what brought her here.
“I just thought it would be fun,” she said. “I miss my family; they’re all back in California. So, when I saw the ad, I thought I have to do that.”
Ali and her father, who’s a mechanic, have done some sculpture-making through welding together. Soldering was undoubtedly served as creative comfort food, but TinkerSpace also seemed to satisfy Ali’s curious and inquisitive nature.
“This is really cool,” she said. “I didn't know that my school had things like this.”
Final thoughts
If you’re interested in getting into projects that might require soldering, this is a great way to get some experience. But you don’t need to have soldering in your future to attend. It’s also a great opportunity for anyone who enjoys crafting or working with their hands, or those who simply want to take a break from screens and textbooks.
The next Soldering 101 is on March 4 at 1:00pm in Rettner Hall’s Fabrication Studio. You can find all upcoming TinkerSpace programs on the University calendar or visiting the TinkerSpace calendar. ∎
Enjoy reading about the University of Rochester Libraries? Subscribe to Tower Talk.
